What Are Zones?
Zones in Yojee TCMS are custom-drawn geographic areas on the map. They help you organise and automate your operations by enabling:
-
Filtering tasks in the Items screen by location
-
Automated dispatch of tasks within a specific region
-
Defining operational responsibility for tasks inside a drawn boundary
Zones are especially useful for managing driver territories, depot catchments, and location-specific rules.
How to Create a Zone
Step 1: Navigate to the Zones Interface
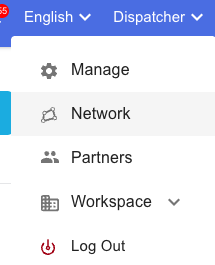
-
Click your profile name in the top-right corner.
-
From the dropdown, select Network.
-
Click the Zones tab at the top of the screen.

Step 2: Add a New Zone
-
Click Add Zone in the top right
-
Enter a Zone Name and an optional Description to help identify its purpose.
Step 3: Draw the Zone on the Map
-
Begin drawing by clicking points on the map by selecting the pencil icon—each click adds a corner to your zone.

-
Don’t worry about precision—you can refine or add more points later.
-
To complete the zone, close the shape and click Save.

Editing and Refining a Zone
-
If you’re unable to add more points, save the current version first.
-
Then, click on the saved zone to reopen it and continue editing.
-
Additional points and adjustments can now be made.
- The finger icon will allow you to move/add points and the trash icon will delete the zone completely

Tips for Using Zones Effectively
-
Use clear, descriptive names for each zone to avoid confusion.
-
Combine zones with Dispatch Rules to automate task assignments.
-
Use zones to segment operational areas, like warehouse regions or driver regions.